Proper Use and Safety for Cali Lift® Glute Developer glute exercise

click image to enlarge

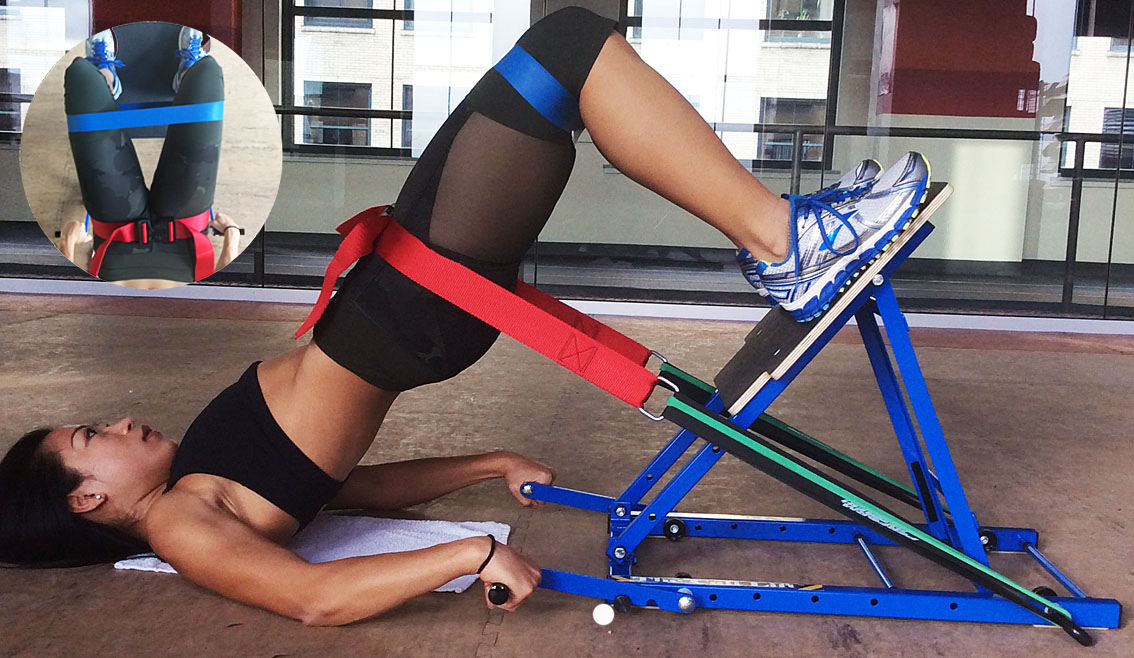
Start position
*confirm all of the following before starting the hip raise
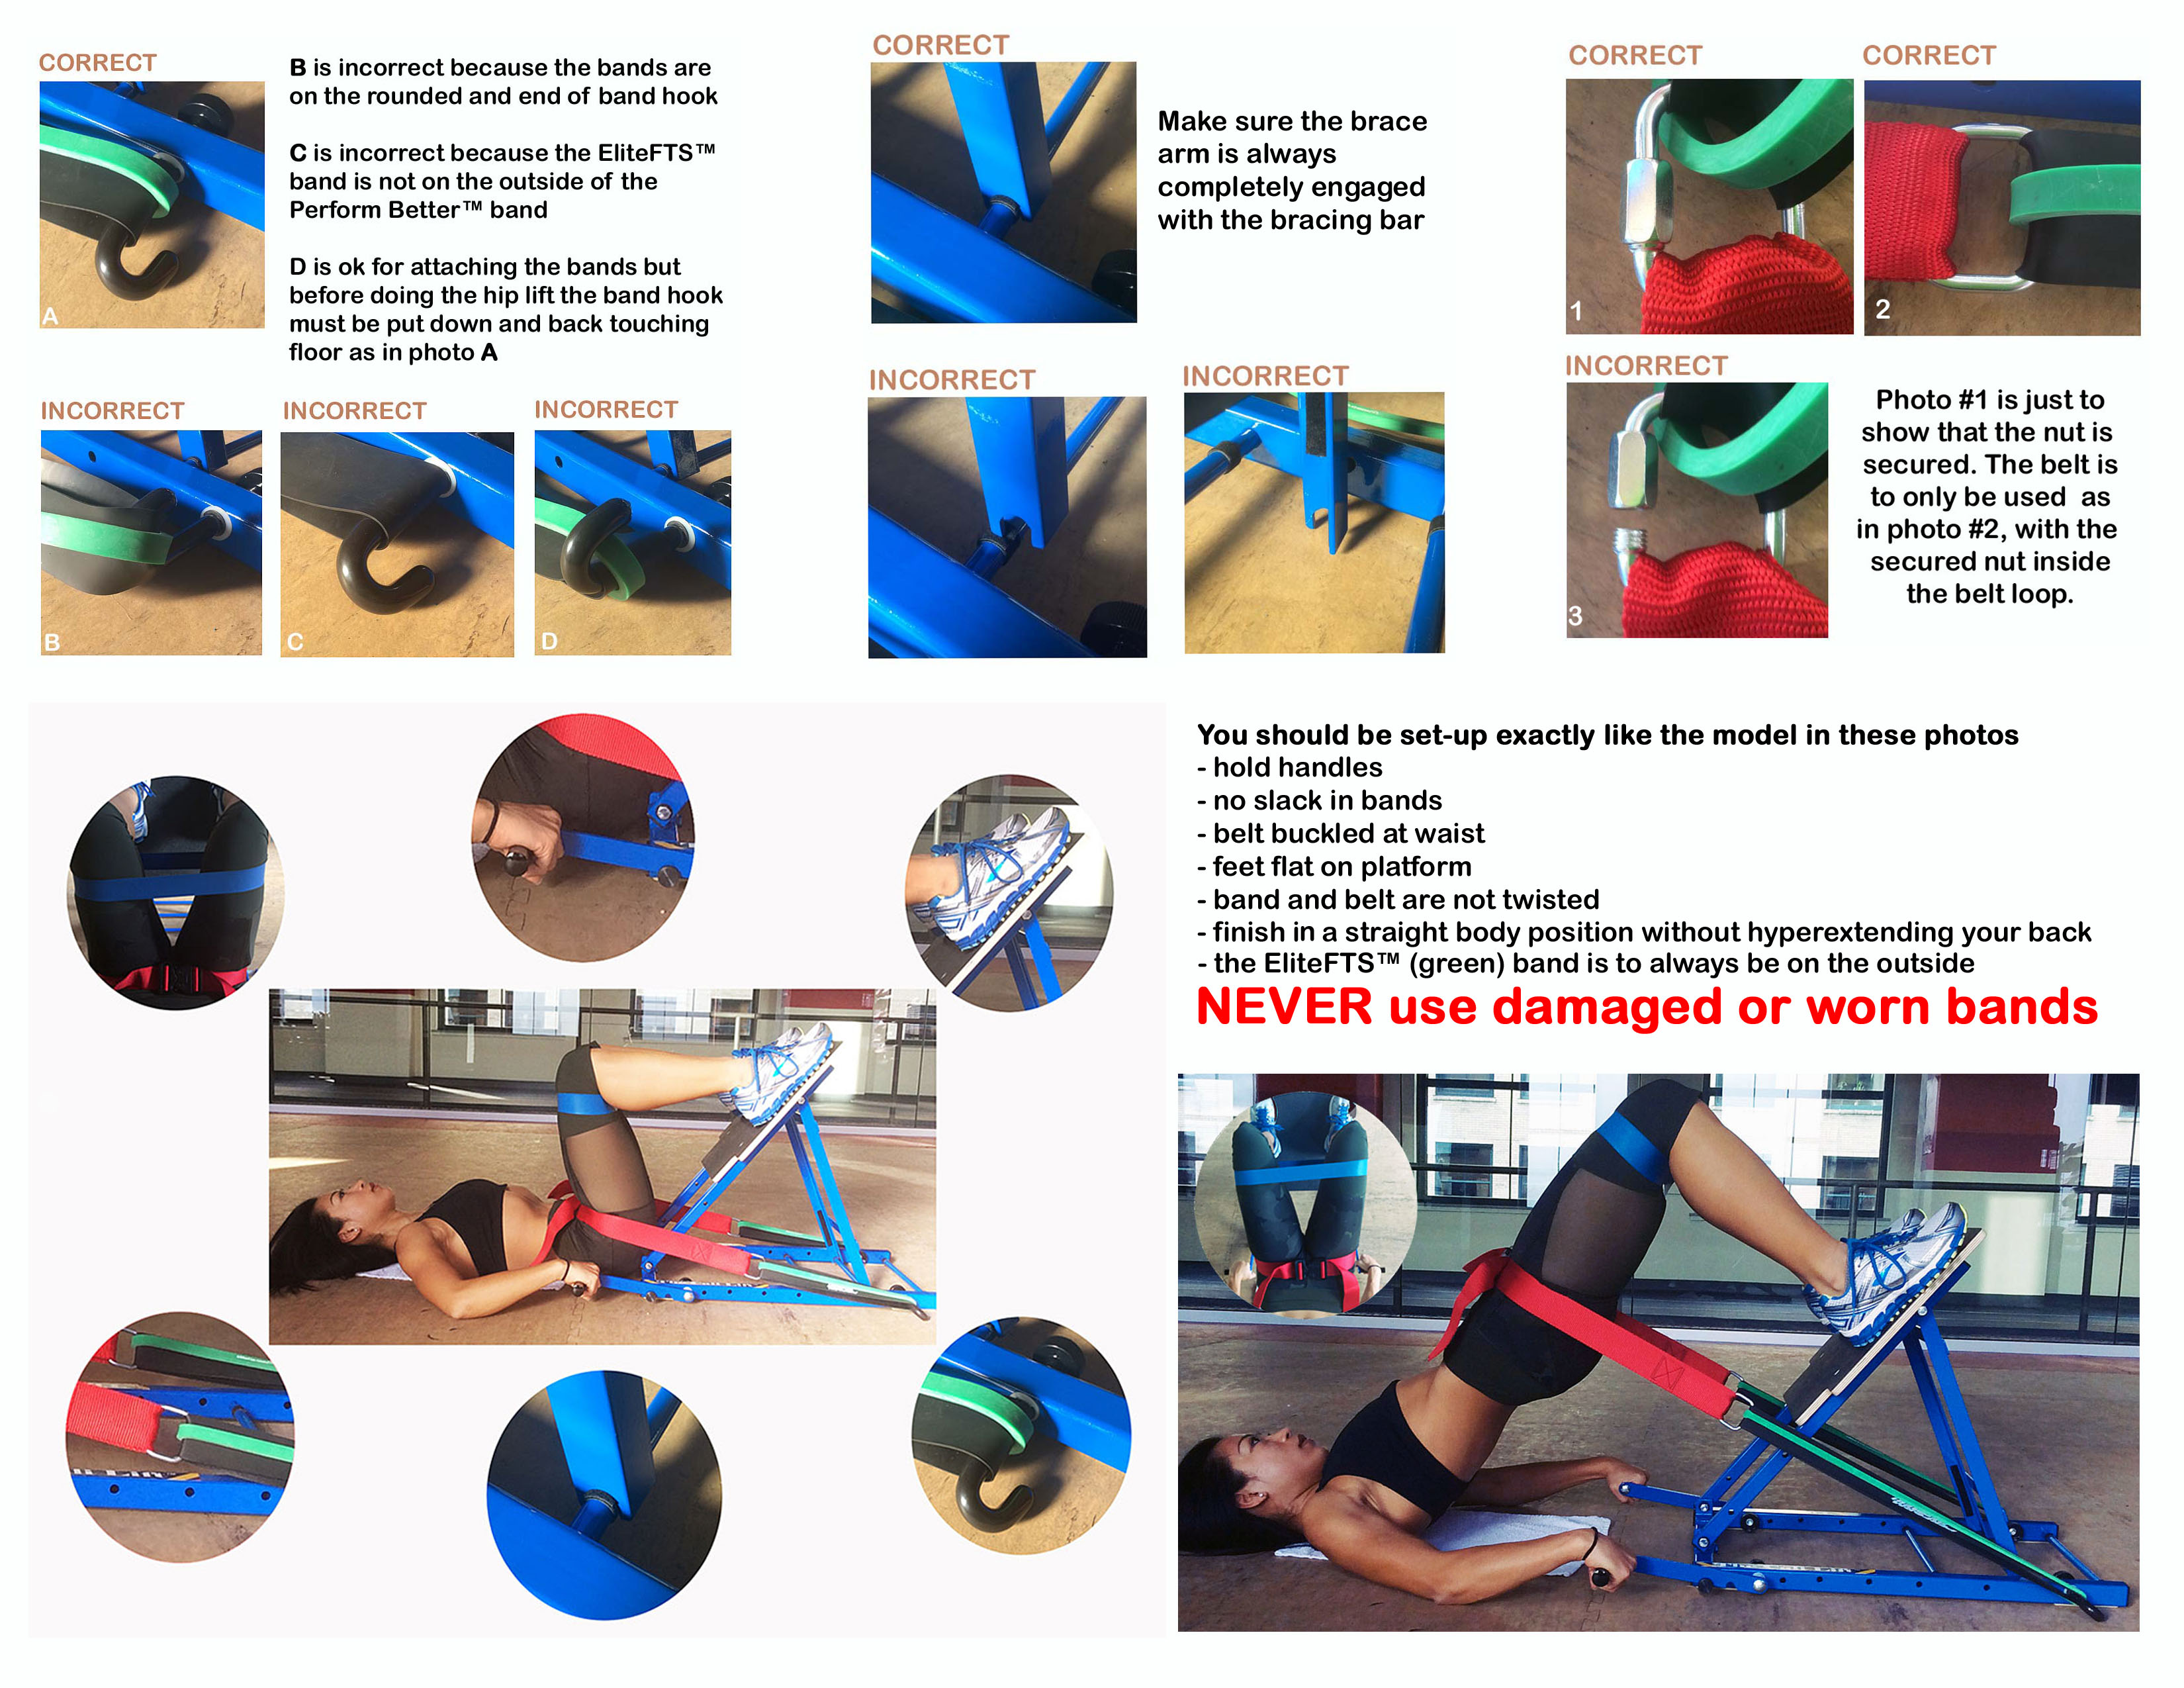
-band hook is down and back and in contact with the floor
-bands are only on the main flat part of the band hook, never on the bend or end of the band hooks
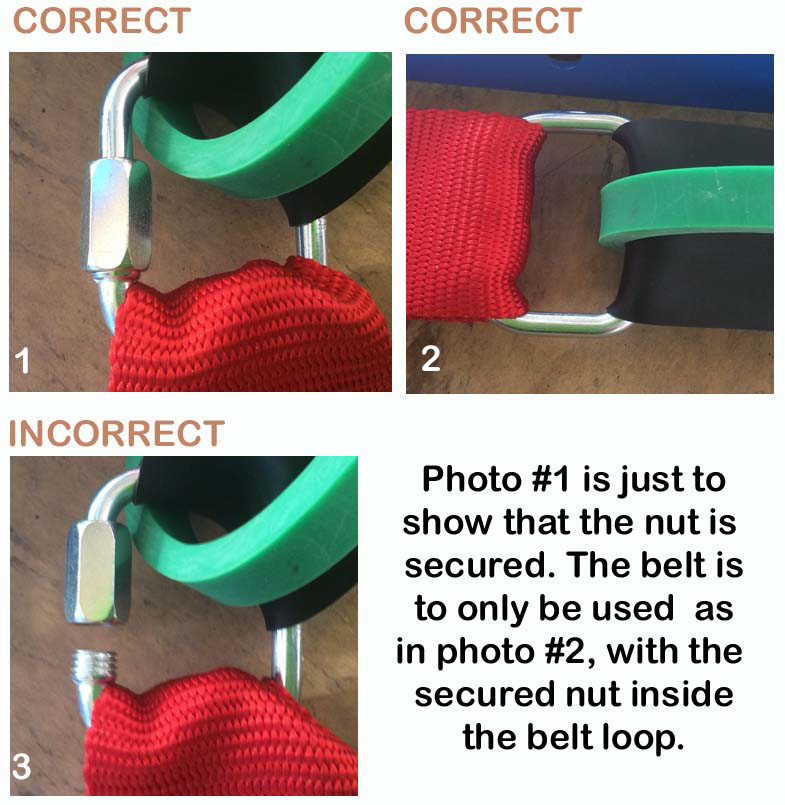
-square band link is securely attached to belt and lock nut is closed
-green EliteFTS™ band is placed on top of the black Perform Better™ band(s)
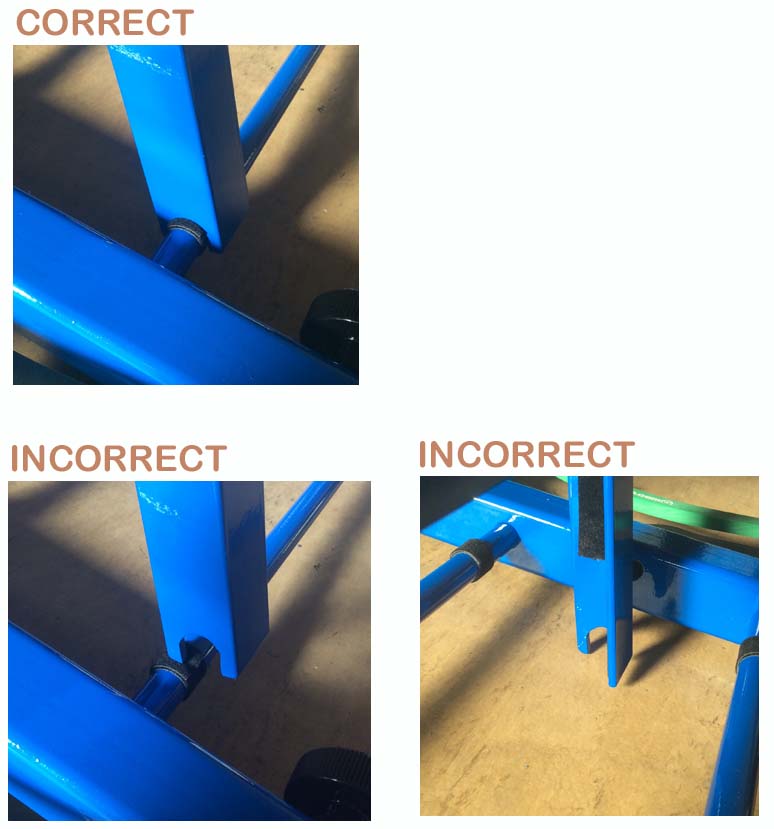
-bracing arm is fully engaged with the bracing bar
-the plastic thumb nuts for band hooks and handles are snug but not overly tight
-no slack in bands
-feet are flat on foot platform
-hands are holding the handles
-knee band is above the knees. Knees are as wide as feet
-belt buckle securely clipped with belt in your hip crease (adjust slightly based on comfort)
-NEVER use any band that is damaged or shows any signs of wear
Photos showing correct set-up and incorrect set-up

click image to enlarge
Finish Position
-slowly squeeze glutes until you reach a straight body position
-do not hyperextend your lower back
-keep knees as wide as your feet during the entire movement
-you can adjust tension during a set by pushing or pulling the Cali Lift®
-slowly return to starting position and repeat
There are 3 accessories we recommend you have to keep your Cali Lift® working and looking great for years.

- First are a pair of 9/16 wrenches. We recommend checking the tightness of the 4 main bolts on a monthly basis. You’ll find the Cali Lift® is easier to handle if the bolts don’t get loose.

2. The other accessory is a roll of blue Clean Room Tape available from McMaster-Carr. The Cali Lift® is portable so it’s going to eventually bump into something and scratch or chip. If you like your fitness equipment to show its battle scars then you won’t need this tape. If you like to keep your products looking good then get this roll of Clean Room Tape to cover any nicks or scratches. Or better yet tape edges and corners before they bump into anything. The blue matches nearly perfectly so it will be barely noticeable. We use the 1/2″ x 36yd High Bond BLUE tape product number 7735A13 on all of the edges. It looks and works great. One roll will last forever.

3. Some of you may want to get furniture slides. These are highly recommended for people who use it on carpeting, yoga mats or regular gym mats. We do not recommend them for people, like Physical Therapists, who often use their Cali Lift® on treatment tables. The material on those tables can be too soft and these may cause indentations that may become permanent.
We recommend getting 4 1″x 4″ furniture slides and attaching them to the bottom of your Cali Lift®. The package is usually between $6-$10. Any local hardware store should have them or you can order them online.
Common issues
1. The Cali Lift® raises when doing hip raises
This is usually due to improper firing of your glute muscles. This is very common. As you use the product more you will learn to fire your glutes better and raising of the Cali Lift® should decrease. Be sure to always hold the handles.
2. It’s too easy or too hard
This is also very common. Each person is different. You really need to test a variety of band combinations to find out what is best for you. Realize that belt length can also play a part in the tension you feel. We recommend adjusting the belt first. Once you find a good belt length then start to play around with band combinations. If your glutes are not working very hard by the 12th rep you need to increase band tension by shortening the belt or adding bands. If you’re close to the correct tension just tighten the belt a little. If you’re far away, start adding bands.
Generally use the bands for big adjustments and the belt length for fine tuning the amount of resistance. It doesn’t matter how strong you are, there will be a band combination that will work for you (do not exceed 500lbs of tension). If you can do more than 500lbs, you’re a BEAST and we want to stay on your good side. We have you covered. We can just send you another belt and set of band hooks to take the limit up to a ridiculous 1,000lbs. Nobody short of Hercules is too strong for the Cali Lift®.
Remember that no matter what your band combination is the EliteFTS™ bands must be placed on the outside of the Perform Better™ bands.
3. The belt causes pain
If the belt is causing pain to your hip, waist or legs simply readjust its position. We have had some people complain that the belt was slightly painful. But for every single one of them we were able to find a comfortable position for the belt. Typically right at the crease of the hip (when knees are bent) works best. If you can’t find a comfortable position use a towel or piece of padding.
This is a file that can be saved and printed to be kept by your Cali Lift® to remind you of important safety information
en español

You must be logged in to post a comment.